
The Ultimate Beginner’s Guide to DIYing Your Wedding Cake
Everything you need to know to Bake, Stack, Decorate, Transport, and Serve Your First Wedding Cake
Estimated Read Time: 45-60 minutes
This guide is for you if:
You’ve never made a tiered cake before
You’re trying to keep costs reasonable
You don’t have a kitchen full of specialty equipment
You want a beautiful, classic wedding cake without complicated techniques
This guide is not for you if:
You want to learn advanced sugar flowers or fondant sculpting
You’re looking for from scratch cake recipes
You’re planning an elaborate style cake
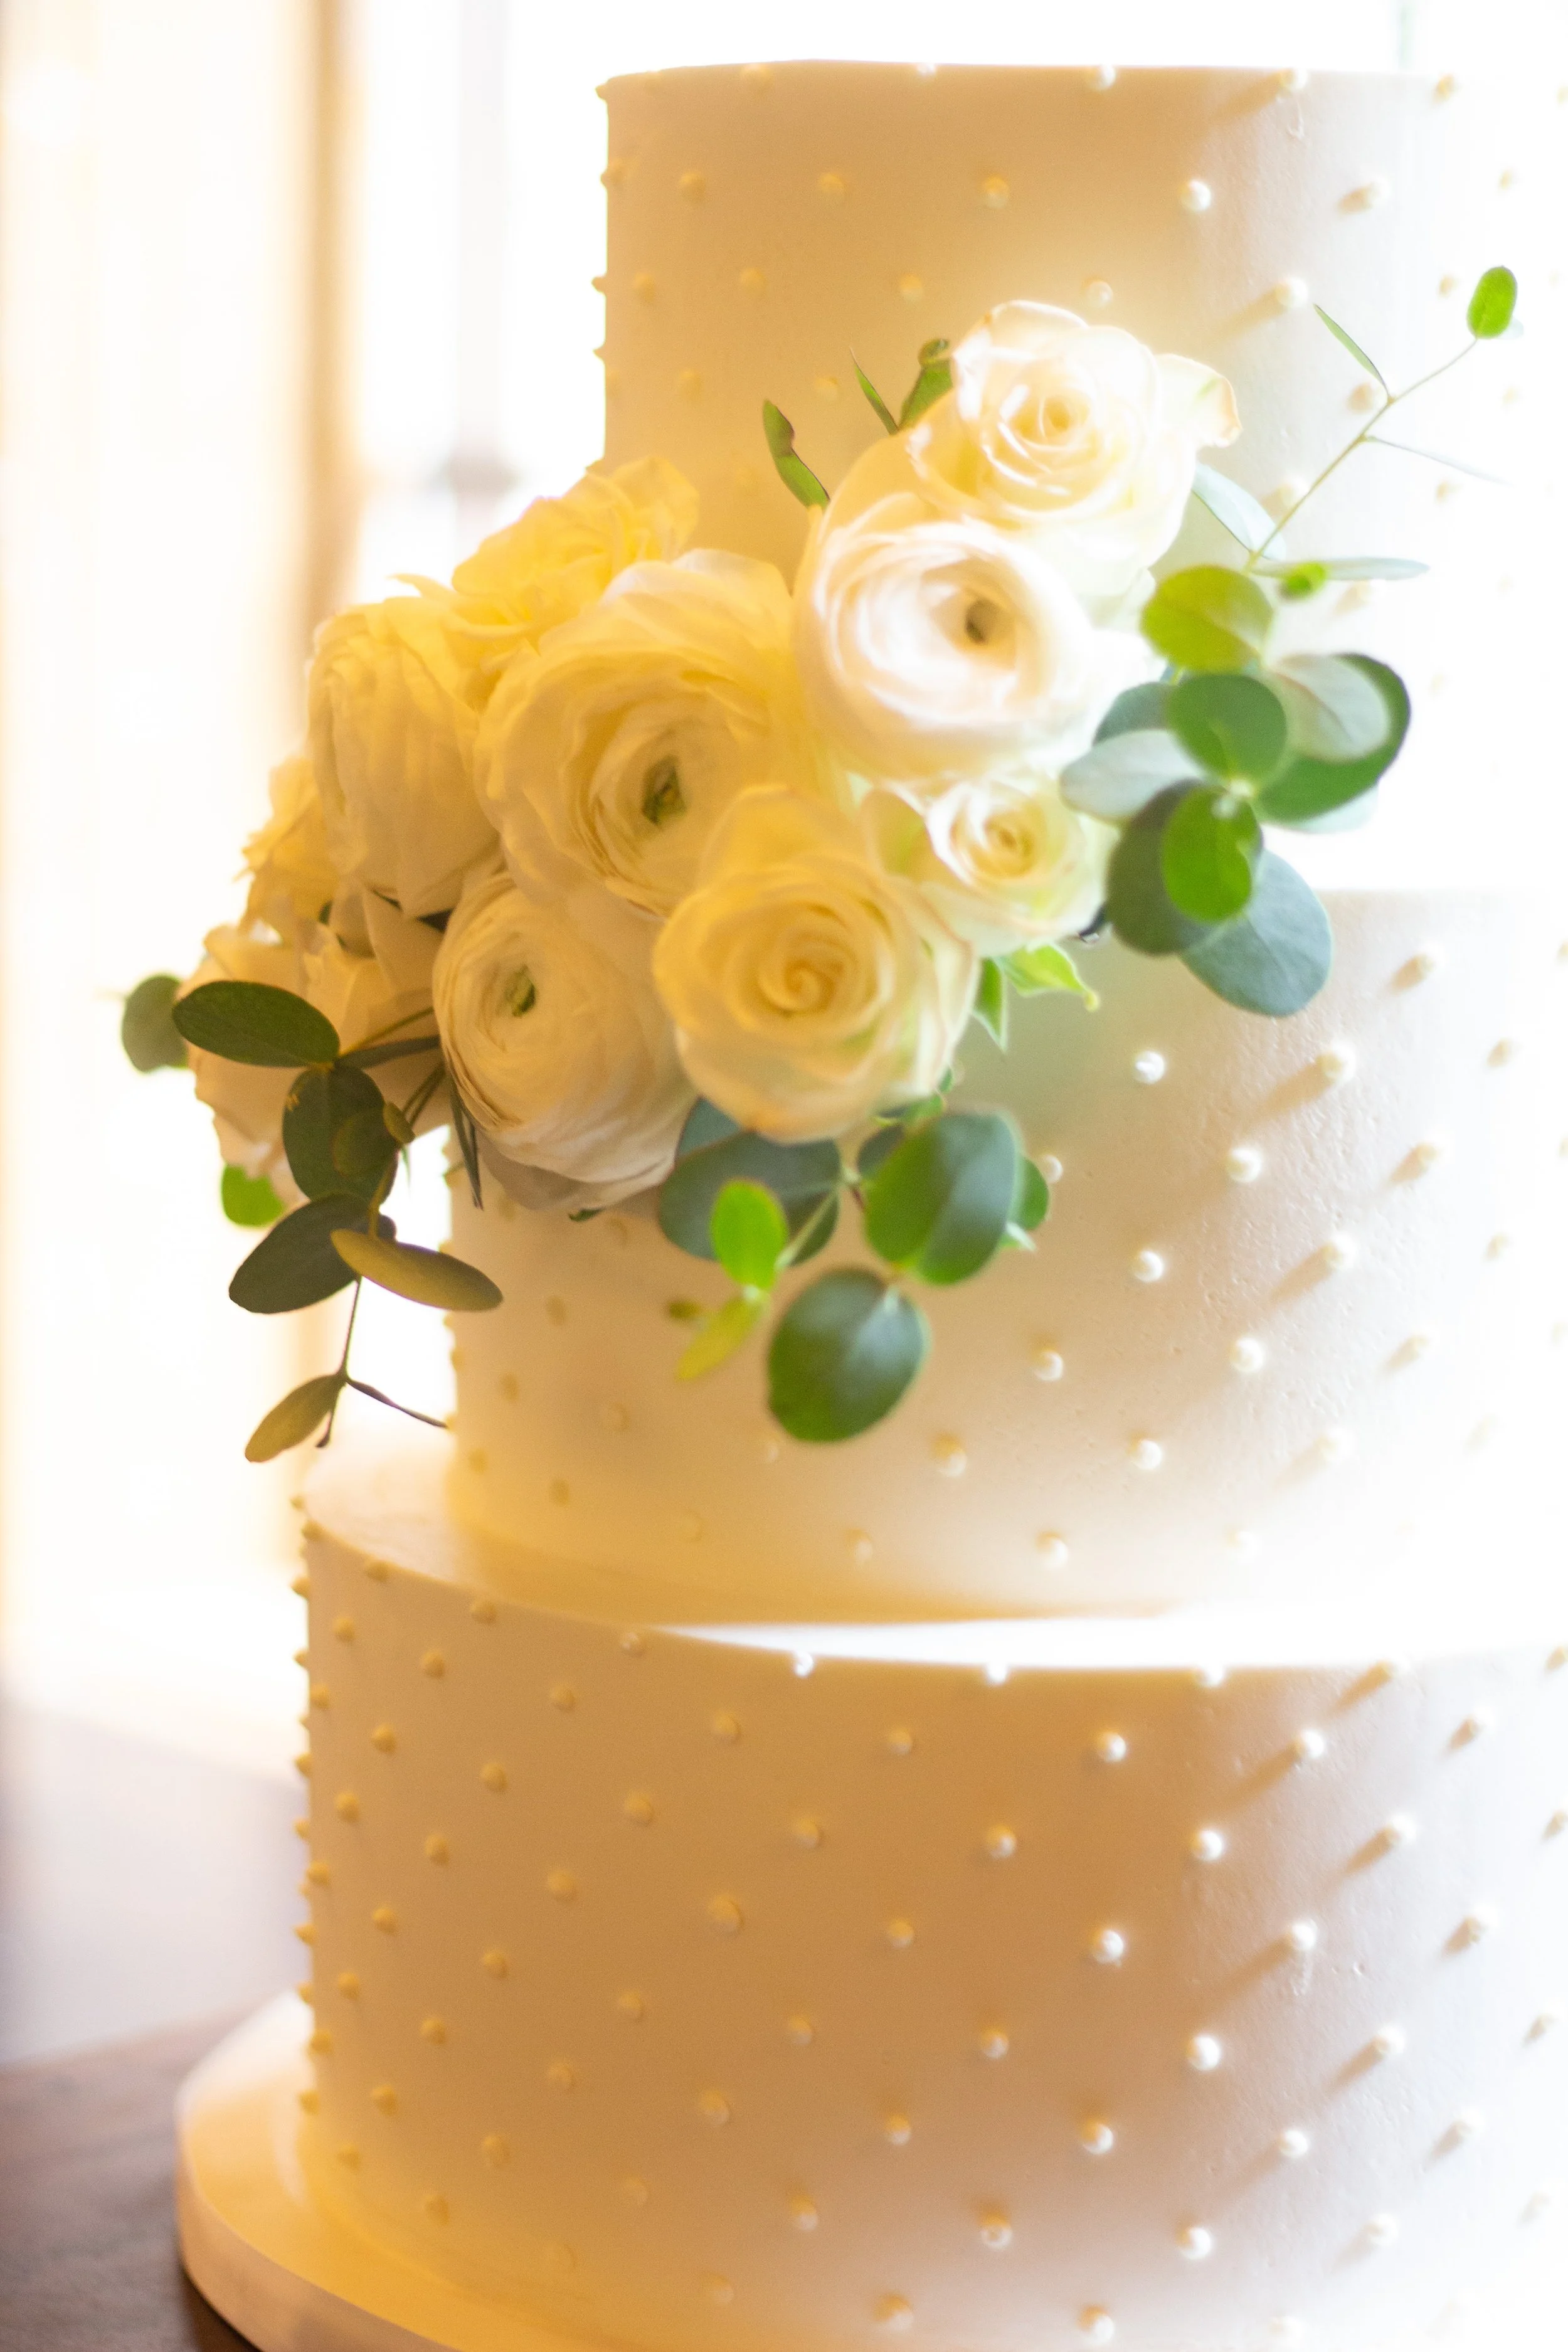
Table of Contents
Is DIY right for you?
Readiness quiz
Choosing a beginner friendly design
PART 2: Planning Your Cake
Guest count
Budget
Shopping list
Timeline
PART 3: Choosing Your Ingredients
Best boxed cake mixes for beginners
Fillings
Buttercream
Flavor combinations
PART 4: Baking & Preparing Your Cake
Baking
Leveling
Filling
Crumb coat
Final coat
PART 5: Stacking Your Wedding Cake
Beginner friendly finishes
Fresh flowers or faux flowers
Finishing touches
PART 7: Transport & Wedding Day
Moving the cake
Setup
Cake cutting
PART 8: Troubleshooting
Leaning cakes
Cracked buttercream
Sliding tiers
Emergency fixes
PART 9: FAQs
PART 10: Free Printables & Resources
Before You Begin
Before we talk about cake flavors, buttercream, or decorating techniques, let's answer one important question:
Should you make your own wedding cake?
There isn't a right or wrong answer. For some couples, creating their wedding cake becomes one of their favorite memories. For others, it adds unnecessary stress during an already busy week.
My goal isn't to convince you to DIY or to hire a bakery. My goal is to give you the information you need to make the decision that's best for your wedding, your budget, and your experience level.
This guide assumes you've never stacked a cake before. If you've never used a cake turntable, don't know what a crumb coat is, or have never piped frosting, that's completely okay. Every section is written with beginners in mind.
One thing you'll notice throughout this guide is that I focus on keeping things simple and affordable. I won't ask you to buy expensive specialty ingredients you'll only use once, and I won't overwhelm you with professional techniques that aren't necessary for a beautiful wedding cake.
Instead, I'll show you practical methods that produce elegant results using ingredients and tools that are easy to find.
Let's start by figuring out if making your own wedding cake is the right choice for you.
PART 1Is DIYing Your Wedding Cake Right for You?
There are plenty of reasons couples decide to make their own wedding cake. Saving money is usually the first one, but it's rarely the only reason.
Some couples enjoy creating something personal for their wedding day. Others have a family member or friend who loves baking and wants to contribute in a meaningful way. Some simply enjoy the challenge of learning a new skill.
At the same time, a wedding cake is different from making a birthday cake for home. It has to look beautiful, travel safely, hold up for hours, and serve dozens, or sometimes hundreds of guests.
Before committing to DIY, consider both the advantages and the challenges.
Why Couples Love DIY Wedding Cakes
It can save money compared to hiring a professional bakery.
You have complete control over the design and flavors.
It becomes a meaningful part of your wedding story.
You can work at your own pace leading up to the wedding.
You'll learn skills you can use long after your wedding day.
Things to Consider
Your wedding week is already busy.
You'll likely need to practice before making the final cake.
Transporting a tiered cake requires planning.
Decorating often takes longer than expected.
Purchasing tools can reduce the amount of money you actually save.
None of these are reasons not to DIY. They're simply things worth considering before making your decision.
Simply Sweet Pro Tip
The biggest mistake I see isn't a cake collapsing or frosting melting.
It's couples choosing a cake design that's beyond their current skill level.
A simple, beautifully finished buttercream cake with fresh flowers almost always looks more elegant than an overly complicated design that becomes stressful to recreate.
Choose a design that lets you enjoy the process—not one that makes you dread it.
DIY Wedding Cake Readiness Quiz
Answer each question honestly.
Give yourself 1 point for every "Yes."
Experience
☐ Have you baked a layer cake before?
☐ Have you frosted a cake before?
☐ Have you used a cake turntable before?
☐ Have you ever decorated a cake with buttercream?
Planning
☐ Can you dedicate several evenings during the week before your wedding to baking and decorating?
☐ Do you have enough refrigerator space?
☐ Do you have someone else who can help transport or set up the cake?
☐ Are you willing to bake a practice cake first?
Expectations
☐ Are you happy with a classic, elegant design instead of an elaborate showpiece?
☐ Will you be okay if your cake isn't absolutely perfect?
Your Results
8–10 Points
You're in a great position to DIY your wedding cake. With careful planning and the guidance in this article, you have a strong chance of creating a beautiful cake you'll be proud to serve.
5–7 Points
You're close! I highly recommend baking and decorating at least one full practice cake before your wedding. That experience alone will build confidence and help you identify any tools or techniques you need to improve.
0–4 Points
That doesn't mean you can't make your own wedding cake—it just means you should think carefully about your options. Consider simplifying the design, making a smaller display cake with sheet cakes for serving, or asking an experienced friend or family member to help.
Remember, your wedding cake doesn't have to be perfect to be meaningful.
Choosing a Beginner-Friendly Design
One of the best ways to set yourself up for success is choosing a design that matches your current skill level.
Pinterest and Instagram are filled with stunning wedding cakes, but remember that many of those cakes were created by professional decorators with years of experience.
For your first wedding cake, your goal shouldn't be perfection. It should be creating a cake that looks beautiful, photographs well, and lets you enjoy the process.
Below is how I would honestly rate each style for a first-time cake maker.
★Beginner Friendly
Textured Buttercream
Difficulty: ★
If this is your first decorated cake, this is where I recommend starting.
Textured buttercream is incredibly forgiving because the finish is supposed to have movement and texture. Small imperfections disappear into the design instead of standing out.
Perfect for:
Garden weddings
Rustic weddings
Modern weddings
Elegant weddings
Pairs beautifully with:
Fresh flowers
Greenery
Pearls
Cake toppers
Gold leaf
Simply Sweet Recommendation: If I were teaching someone to decorate their very first wedding cake, this would be my choice every time.
Semi-Naked Cake
Difficulty: ★
Despite how elegant they look, semi-naked cakes are one of the easiest styles to create.
Because some of the cake layers intentionally show through the frosting, you're not chasing perfectly smooth sides or razor-sharp edges.
Best for:
Barn weddings
Outdoor weddings
Spring weddings
Boho weddings
Keep in mind that your cake layers need to be baked evenly since they'll be partially visible.
★★ Confident Beginner
Rustic Smooth Buttercream
Difficulty: ★★
This is different from a perfectly smooth bakery finish.
The goal here is clean sides with soft edges and a naturally finished look. You don't need perfectly crisp corners, making it much more achievable for beginners.
Great with:
Fresh flowers
Minimal decorations
Ribbon
Fruit
★★★ Intermediate
Smooth Buttercream with Sharp Edges
Difficulty: ★★★
This is the style many beginners think is the easiest.
In reality, it's one of the hardest buttercream techniques to master.
Creating perfectly smooth sides is only part of the challenge. The sharp top edge requires patience, practice, and proper buttercream consistency.
If your edges aren't perfectly crisp, don't be discouraged. Even experienced decorators continue refining this skill.
Best for:
Modern weddings
Classic weddings
Minimalist designs
Vintage Lambeth
Difficulty: ★★★
The individual piping techniques aren't especially difficult, but consistency is everything.
Keeping borders evenly spaced and maintaining smooth pressure while piping around an entire cake takes practice.
★★★★ Advanced
Fondant Wedding Cakes
Difficulty: ★★★★
Fondant introduces an entirely new set of techniques.
You'll need to learn:
Rolling fondant evenly
Preventing tears
Smoothing without trapping air bubbles
Covering sharp corners
Working within time limits before it dries
Unless you've already worked with fondant, I don't recommend making it part of your first wedding cake.
Hand-Painted, Sculpted & Elaborate Designs
Difficulty: ★★★★
These include:
Sugar flowers
Wafer paper flowers
Hand-painted cakes
Gravity-defying cakes
Sculpted cakes
Intricate carved designs
These are incredible works of art—but they're projects to grow into after you've mastered the fundamentals.
My Recommendation
If this is your first wedding cake, here's exactly what I would choose:
★ Textured white buttercream with fresh flowers provided by your florist.
It's elegant, timeless, forgiving, and photographs beautifully. More importantly, it allows you to focus on building a stable, delicious cake instead of worrying about every tiny imperfection.
Remember: Your guests will remember how your cake tasted and how it fit into your celebration far more than whether the top edge was perfectly sharp.
PART 2Planning Your Wedding Cake
A beautiful wedding cake starts long before you preheat the oven.
Planning is what separates a smooth, enjoyable baking experience from one filled with last-minute grocery runs and unnecessary stress.
In this section, we'll determine:
How much cake you actually need
What your budget should be
Everything you'll need to buy before baking
A realistic timeline that keeps you ahead of schedule
Let's start with one of the biggest questions every couple asks.
How Much Cake Do You Really Need?
One of the biggest misconceptions about wedding cakes is that you need a slice for every guest.
Sometimes that's true.
Often, it isn't.
As someone who has planned desserts for countless celebrations, I encourage couples to think about the entire guest experience, not just the cake.
Ask Yourself These Questions
-
If you're serving appetizers before dinner, many guests will already be full by the time dessert is served.
-
An open bar or signature cocktails usually means guests spend more time socializing and less time looking for a large slice of cake immediately after dinner.
-
Dessert tables with cookies, brownies, cheesecake shooters, cupcakes, macarons, or mini pies almost always reduce the amount of cake guests eat.
Many guests will choose one or two smaller desserts instead of a full slice of cake.
-
Afternoon weddings often see higher cake consumption than late-night receptions where guests have already eaten a full dinner and enjoyed cocktails.
My General Recommendations
These aren't strict rules—they're starting points based on what I've seen at real weddings.
Plan for Full Servings
Use a full serving for every guest if:
Cake is the only dessert
No cocktail hour
Limited appetizers
Dry wedding
Daytime reception
Reduce Servings by 10-15%
Consider ordering fewer servings if you have:
Cocktail hour
Heavy appetizers
Open bar
Dinner service
Reduce Servings by 20-30%
If you're offering:
Cocktail hour
Full dinner
Open bar
Dessert table with multiple options
Late-night snacks
It's very common for guests to sample several desserts instead of eating a full slice of cake.
Simply Sweet Pro Tip
One of the smartest ways to stretch your budget is to create a beautiful display cake for photos and ceremonial cutting, then serve matching sheet cakes from the kitchen.
Your guests receive the same delicious cake, you'll spend less time decorating, and no one will know the difference.
Choosing the Right Cake Size
One of the most common questions I hear is:
"How big of a cake do I need for my wedding?"
The answer surprises most first-time bakers.
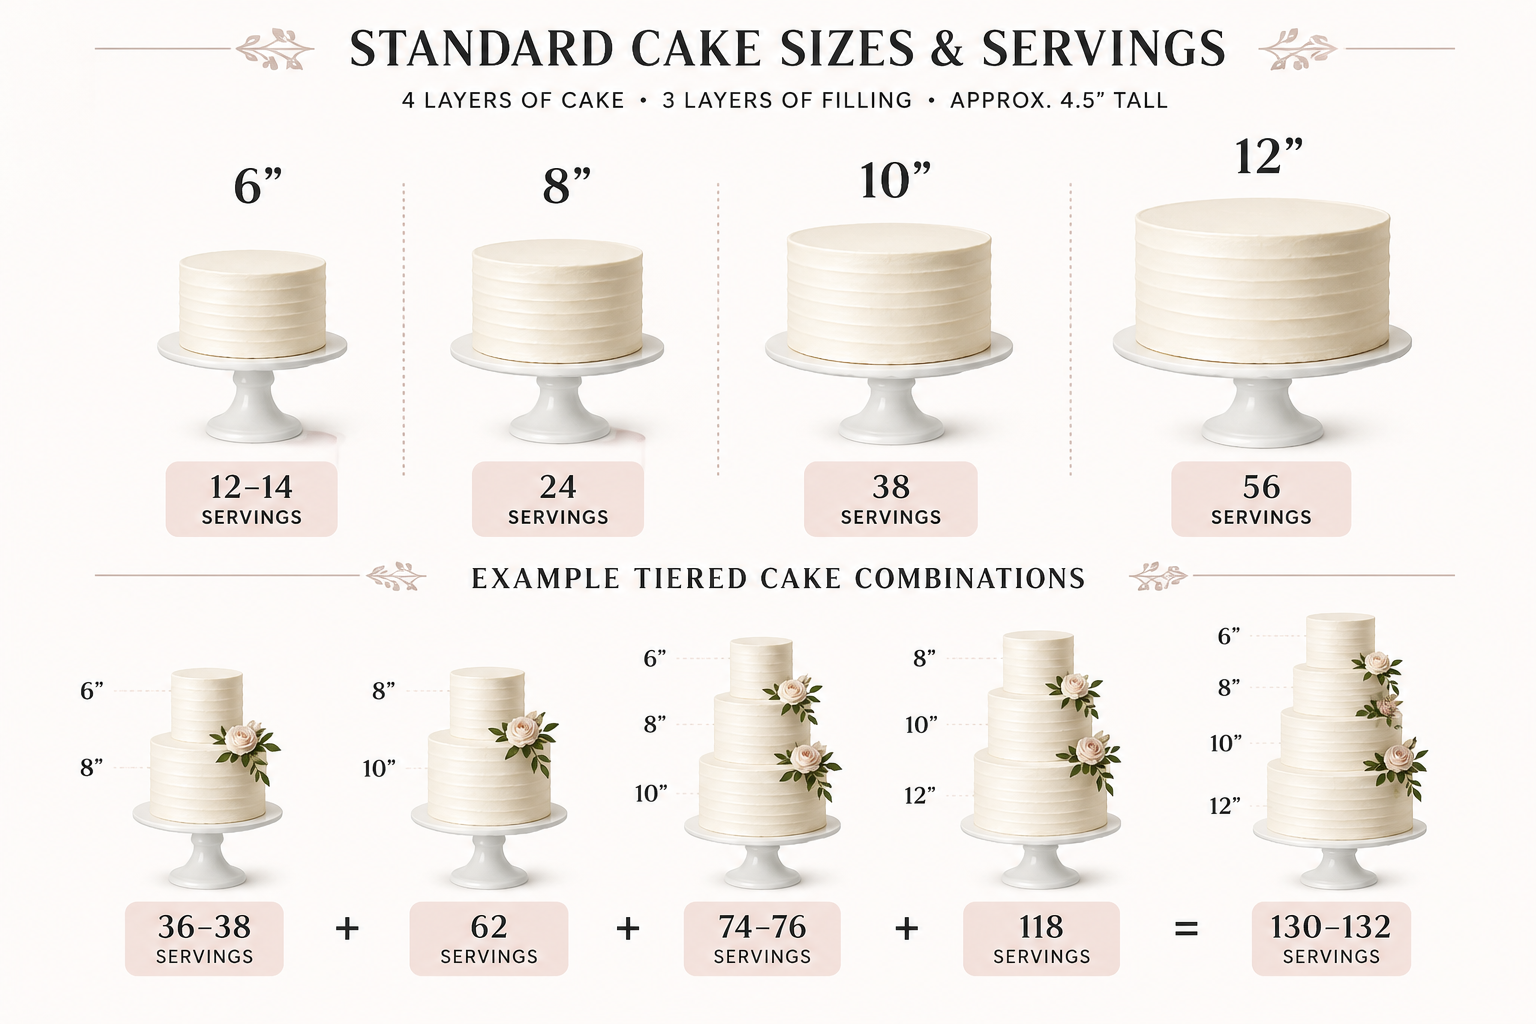
Wedding cakes are built using standard cake pan sizes, and each size produces a specific number of servings. Because of that, you'll almost always have a few extra servings or need to supplement with a kitchen cake or sheet cake.
Think of it like buying pizza. If you need to feed 50 people, you don't order exactly 50 slices—you order whole pizzas and end up with a few extra slices.
The chart below shows the standard cake sizes I use throughout this guide. All serving counts are based on four layers of cake, three layers of filling, and a finished cake height of approximately 4½ inches.
Planning for Your Guests
Before choosing your cake size, think about your entire menu.
If cake is your only dessert, you'll likely want enough servings for everyone.
If you're serving cocktail-hour appetizers, dinner, alcohol, or a dessert table, many guests won't eat a full slice of cake. In those cases, it's often perfectly fine to choose a cake with fewer servings than your guest count.
Simply Sweet Pro Tip
If your guest count falls between two cake sizes, I usually recommend choosing the smaller display cake and serving additional sheet cake from the kitchen. It saves time, reduces decorating stress, and your guests will never know the difference.
Budgeting for Your DIY Wedding Cake
One of the biggest reasons couples choose to make their own wedding cake is to save money—but how much should you actually expect to spend?
To give you a realistic starting point, the estimates below are based on a simple three-tier wedding cake (6", 8", and 10") made with basic vanilla boxed cake mixes, homemade buttercream, and simple decorations. Prices reflect average retail costs in the United States at the time this guide was written. Depending on where you live and the design you choose, your costs may be higher or lower.
Estimated DIY Wedding Cake Budget
Category
Average Cost
Decorations & Flowers
$30-150
Emergency Buffer
$25-50
Starting around $133
Ingredients
Starting around $157
Equipment
Practice Cake
$25-50
Already own most of the baking equipment?
You can make this same cake for around $190–330, since you'll only need to purchase ingredients, decorations, and a few disposable supplies.
Estimated Total:
$370-540
Where Your Money Goes
Ingredients | Starting around $133
This estimate includes everything needed to bake a basic three-tier vanilla wedding cake, including boxed cake mix, eggs, butter, oil, milk, powdered sugar, heavy cream, vanilla extract, and basic fillings.
Choosing a quality boxed cake mix is one of the easiest ways to keep costs down while still creating a delicious, beautiful wedding cake.
Equipment | Starting around $157
If this is your first time decorating a cake, you'll need a few essential tools such as cake pans, cake boards, a cake drum, turntable, offset spatulas, bench scraper, dowels, piping bags, and a sturdy cake box.
The good news is that these are one-time purchases that can be reused for birthdays, holidays, and future celebrations.
Decorations & Fresh Flowers | $30–150
The cost of decorating depends entirely on your design. A simple textured buttercream cake with fresh flowers is one of the most budget-friendly options, while elaborate piping, fondant, and specialty decorations will increase your overall cost.
Practice Cake | $25–50
I strongly recommend making one complete practice cake before your wedding. It's a small investment that gives you the confidence to practice your decorating skills, refine your timeline, and work through any surprises before the big day.
Emergency Buffer | $25–50
Even the best plans don't always go perfectly. Setting aside a little extra for last-minute grocery runs or forgotten supplies can save you unnecessary stress during wedding week.
Simply Sweet Pro Tip
These estimates are based on one of the most beginner-friendly wedding cakes you can make and averages for the United States. As you add premium flavors, intricate piping, fondant, sugar flowers, or additional tiers, both the cost and the time required will increase. If this is your first wedding cake, keeping the design simple will help you stay on budget and set yourself up for success.
Shopping List
With your budget in mind, it's time to start gathering your supplies.
The complete shopping list for a DIY wedding cake can look intimidating at first, but don't worry. Most items fall into just three categories: ingredients, equipment, and decorations. Many of the tools you'll purchase are one-time investments that can be used for birthdays, holidays, and future celebrations.
Here's a quick overview of what you'll need.
Ingredients
These are the items that become part of your cake.
Basic Baking Ingredients
Vanilla boxed cake mix
Eggs
Unsalted butter
Vegetable oil
Milk
Heavy cream
Powdered sugar
Vanilla extract
Fillings & Flavorings
Fruit preserves or curd
Fresh fruit (optional)
Chocolate ganache or caramel (optional)
Gel food coloring (if desired)
Equipment
These are the essential tools you'll use throughout the baking and decorating process.
Cake pans (6", 8", and 10")
Stand or hand mixer
Mixing bowls
Measuring cups and spoons
Parchment paper
Cake boards
Cake drum
Bubble tea straws or cake dowels
Cake turntable
Offset spatula
Bench scraper
Serrated knife or cake leveler
Cake box for transportation
Decorations & Flowers
This category covers everything that gives your cake its finished look.
Fresh flowers or greenery
Cake topper
Ribbon (optional)
Edible pearls or sprinkles (optional)
Decorative piping tips (optional)
Remember, simple designs are often the most elegant. A textured buttercream finish paired with fresh flowers is one of the easiest and most timeless wedding cake styles to create.
Simply Sweet Pro Tip
Before you head to the store, check your kitchen first. You may already own many of the basics like mixing bowls, measuring cups, cooling racks, and even a hand mixer. Purchasing only what you truly need can save you a significant amount of money.
Ready to Start Shopping?
This overview covers the essentials, but if you'd like a complete printable checklist, product recommendations, and my favorite beginner-friendly tools, I've put everything together in one place.
Wedding Cake Timeline
One of the biggest mistakes first-time cake decorators make is waiting until the last minute.
The good news is that wedding cakes can be prepared over several weeks, allowing you to spread out the work and enjoy the process instead of rushing through it.
Here's a simple timeline to help keep you on track.
One Month Before
Bake and freeze your cake layers (optional if you're DIYing multiple parts of your wedding and want to get ahead).
Practice decorating a small two-tier cake.
Purchase cake boards, dowels, cake boxes, and other packaging supplies.
Two Weeks Before
Finalize your shopping list.
Order or purchase any decorations you'll need.
One Week Before
Purchase fresh ingredients.
Pick up or confirm your flowers, if using fresh florals.
Clear space in your refrigerator.
3 Days Before
Thaw your cake layers if frozen (or bake your cakes if you chose not to freeze them).
Make your buttercream and fillings.
Assemble your cake layers.
Apply the crumb coat.
2 Days Before
Apply the final coat of buttercream.
Stack and support each tier.
Store the cake properly until decorating.
1 Day Before
Finish decorating your cake.
Add final details such as fresh flowers, ribbons, or other decorative elements.
Pack any touch-up supplies you'll need for transport or setup.
Wedding Day
Transport the cake carefully to the venue.
Add any last-minute fresh flowers or finishing touches.
Take a deep breath and enjoy the moment—you made your own wedding cake!
Simply Sweet Pro Tip
If you're new to cake decorating, don't plan to finish your cake late the night before the wedding. Building in extra time gives your buttercream a chance to chill between steps, reduces stress, and leaves room for any unexpected touch-ups.
Want a Printable Version?
I've created a detailed wedding cake timeline with a complete checklist you can print and mark off as you go. It includes recommended completion dates, shopping reminders, baking schedules, and decorating milestones to help you stay organized from start to finish.